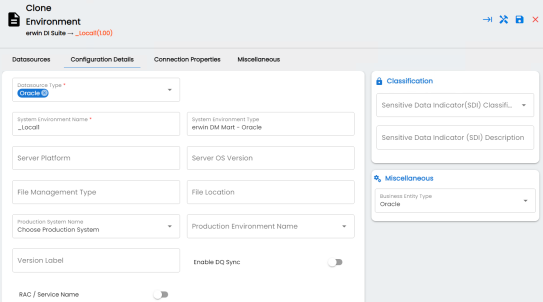
You can clone an environment under a system and use the same or different connection parameters in the cloned environment. The cloned environment is saved under the system.
To clone environments, follow these steps:
- Go to Application Menu > Data Catalog > Metadata Manager > Explore.
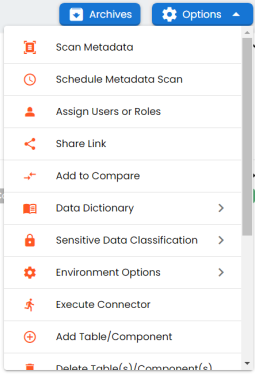
- On the Explore tab, click an environment tile and click Options.
The available options appear.

- Click Environment Options > Clone Environment.
- Enter appropriate values in the fields. Fields marked with a red asterisk are mandatory. Refer to the following table for field descriptions.
- Click
 to test the connection.
 - Click
 .
.
The New Environment Cloning page appears.

|
Field Name |
Description |
|---|---|
|
Datasource Type |
Specifies the datasource (database) type from where you wish to scan metadata. You can change the datasource type using the drop down list. For example, Sql Server. Depending upon the database type, you need to provide additional fields in the Connection Properties tab. For SQL Server (Windows Authentication), Sybase, HP Vertica, and Neteeza databases, the TestConnectionQuery option is selected by default to validate the internal connection. The system displays exceptions if this option is not selected. There are no additional fields for MS Excel File, and XSD. |
|
System Environment Name |
Specifies the unique name of the environment. For example, EDW-Test. For more information on naming conventions, refer to the Best Practices section. |
|
System Environment Type |
Specifies the type of the environment. For example, development, test, or production. |
|
Server Platform |
Specifies the server platform of the environment. For example, Windows. |
|
Server OS Version |
Specifies the OS version of the environment's server. |
|
File Management Type |
Specifies the file management system (if the environment is a file-based source). For example, MS Excel. |
|
File Location |
Specifies a file path (if the environment is a file-based source). For example, C:\Users\Jane Doe\erwin\Mike - Target System |
|
Production System Name |
Specifies the system name being associated with the environment as the production system. For example, Enterprise Data Warehouse. |
|
Production Environment Name |
Specifies the environment name being associated with the environment as the production environment. For example, EDW-PRD. |
|
Data Steward |
Specifies the name of the data steward responsible for the environment. For example, Jane Doe. Users assigned with the Legacy Data Steward role appear as drop down options. You can assign this role to a user in the Resource Manager. To assign data steward, select a data steward from the drop down options. |
|
Version Label |
Specifies the version label of the environment to track change history. For example, Alpha. For more information on configuring version display, refer to the Configuring Version Display of the Environments topic. |
|
Enable DQ Sync |
Specifies whether to sync data quality analysis results from DQLabs. To view data quality analysis, ensure that you have configured DQLabs connection setting in erwin DI. For more information, refer to the Configuring DQLabs topic.
Data quality analysis is available for environments using Oracle, Salesforce, Snowflake, MySQL, MSSQL, Hadoop, and PostgreSQL database types. |
|
RAC/Service Name |
|
|
Sensitive Data Indicator (SDI) Classification |
Specifies the sensitivity data indicator (SDI) classification of the environment. Also, you can add multiple classifications to the environment. For example, PHI, Confidential. For more information on configuring SDI classifications, refer to the Configuring Sensitivity Classifications topic. |
|
Sensitive Data Indicator Description |
Specifies the description of the SDI classification. |
|
Business Entity Type |
Specifies the database type of business entity. |
If the connection with database is established successfully then a success message pops up.
The environment is cloned and the cloned environment is saved under the system.
Different database types have different prerequisites and connection parameters:
|
Copyright © 2024 Quest Software Inc. |